

I have grown used to wonders coming from the kitchen, delightful morsels of heavenly sustenance that I look forward to whenever I hear loud music from the kitchen (the tell tell sign that Mark is creating). Well, a few days ago I was left standing in a blissful state of happiness as I chewed through a fresh baked bagel with some cream cheese and chives, OMG you should have been there it was a standout moment.
Now, I love bagels, always have done but have always bought them from the bakers or supermarket as we both thought that in some way they where a magical creation that need specialist equipment or techniques to make. In other words leave it to the professionals. With this in mind you can imagine my guarded joy when I was informed that Mark was going to recreate some in our very own humble kitchen. Oh how quick was I to judge and then to have to internally have to eat humble pie when it turned out to be such a showstopper.
Bagel recipes are not often found in cook books, maybe more of an American thing I don’t know but that is our experience. This changed recently when Mark added another cookbook to his collection, he is collecting all the books by Leith’s in their bible series that he absolutely raves about for their excellent mixture of well written recipes in addition to the wealth of informative additional information that will help you become a better cook. Well tucked in the “Baking Bible” book was the rare but legendary bagel recipe, and Mark having studied it decided to was achievable. Having tasted the results I begged him to share with me how he did it so I could in turn share it with you. You may not know it yet but today you are about to have an awesome day, read on…
The only specialist equipment you need is a plant spray bottle, or something that can turn water into a spray mist. Additionally for an even more authentic bagel a pizza stone in the oven is helpful, but not essential.
You will need the following ingredients:
- 450g strong white bread flour (organic and unbleached if possible)
- 1½tsp salt
- 15g yeast (fresh if possible)
- 225ml mix or water and milk at room temperature in a jug
- 1tsp of caster sugar
- 1tsp malt extract or molasses
- 1oz melted butter that’s cooled
- 1 medium egg lightly whisked
- Handful of sesame seeds (not essential but desirable)
Method:
Sift your flour and salt into a large mixing bowl and make a well in the middle. Whisk the yeast into the milk/water mixture and then add the sugar and malt extract. I found that it was helpful to add a couple of spoonfuls of the above mix to the melted butter and stirring to make the butter runnier. The main reason for this is that you reduce the risk of the melted butter hitting the colder ingredients and seizing up into chilled lumps. Now add the butter and whisked egg to the liquid mix and give a final good whisk to make sure it’s all mixed with no lumps and everything is dissolved. Now pour the liquid ingredients into the dry ingredients and add the salt. Now, depending if you’re a mechanical person or a physical person you need to either knead by hand for 10 minutes or in a food mixer with a dough hook for around 6 minutes. Either way you should end up with a smooth elastic ball of bread dough that you now need to lightly coat with olive oil and place into a clean lightly oiled bowl. Cover with oiled cling film and then a couple of tea towels and place somewhere out of drafts for an hour or two till it’s at least double in size.
You need two baking sheets that have been lightly oiled for our bagels to grow on.

Through this next stage try and use as little extra flour as possible on the dough as it will make the finished product heavier and tougher. Remove the dough from the bowl and knock back (punch it) and then knead it for no more than 30 seconds to get the air out. Divide the dough into 10-12 equal sized portions and roll them into balls. Take a ball and squash gently between your palms and then poke a finger through the middle to make a ring shape. The dough will naturally tend to try and shrink the hole as it contracts so you need to either stretch it gently and evenly so keep the hole around 4-5cms wide or stick it on your finger and spin it so centrifugal forces do the job for you (this is a skill that takes some practice!) Now place the newly formed baby bagel on your oiled baking sheet and then grab the next ball of dough, repeat this step till they are all done. Finally cover them with another sheet of lightly oiled clingfilm and set aside somewhere warm and draft free for 20-30 minutes till they are all big and fluffy and soft bagel looking.
You want to cook your bagels near the top of the oven so in your cold oven place two shelves one in the top 1/3rd of the oven and one just below. Place your pizza stone on the top shelf and on the lower shelf place an empty roasting tin, close the door and allow to heat up to 220C or 425F.
Whilst you’re waiting we can set up the poaching bath. For this you need a large saucepan ¾ filled with water. Add 1 tablespoon of malt extract and then bring to the boil. Reduce the heat slightly so that you have bubbles rising to the surface every few seconds. It is essentially that it is not boiling to energetically as the bagels want a relaxed bath or they will lose some of their puffy wonderfulness that you have so patiently cultivated.
Fill a kettle up and boil it.
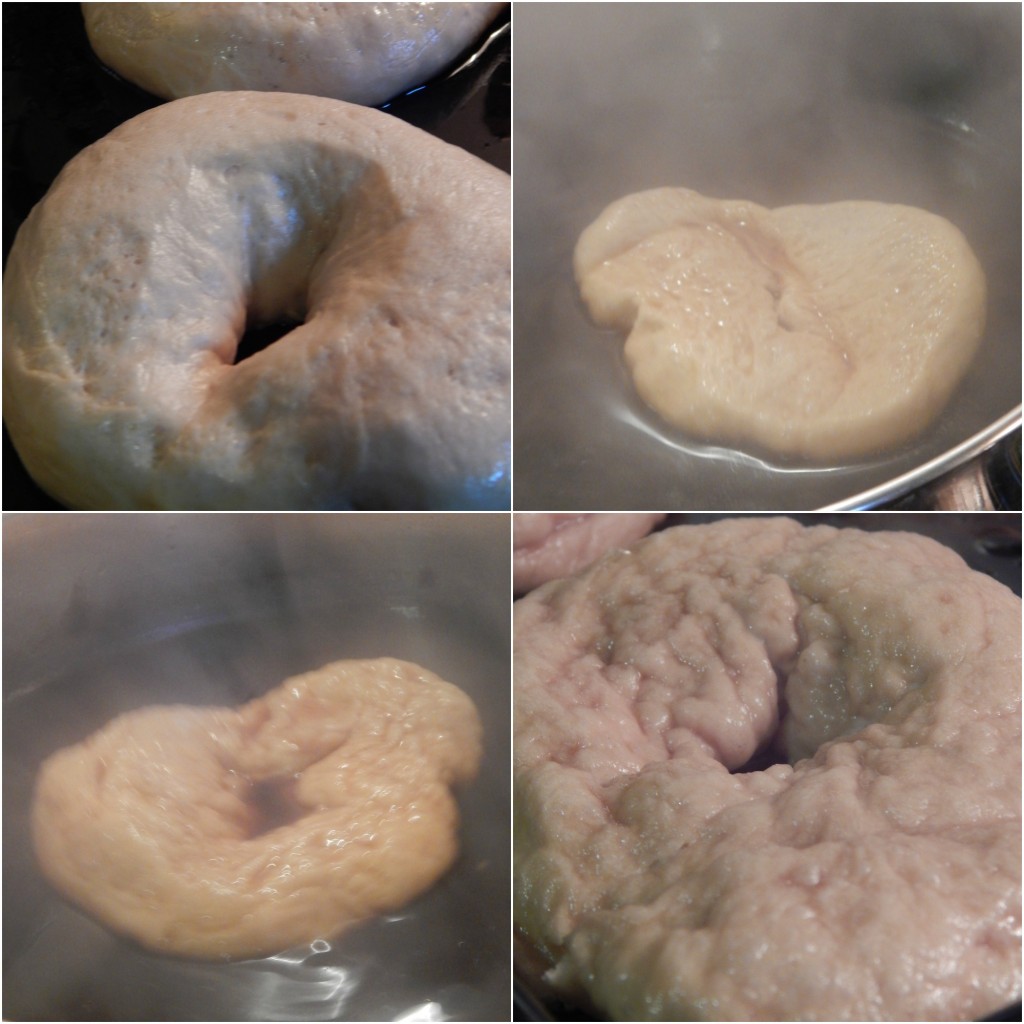
When all is ready take a single bagel and gently lift it from the baking tray and place in the water, after 10 seconds and not a second longer flip the bagel upside down, after another 10 seconds gently remove with a slotted spoon and return to the baking tray to drain a bit, sprinkle your sesame seeds over the top.
Top tip if the bagels come out of the water flat and deflated to much then you have left them in too long and need to reduce the time spent poaching, you can’t help but lose some of the air in a kitchen environment but we want to minimise the lose.
Once you have finished poaching them all that’s left to do is the baking part. Now depending on how confident you are about handling the uncooked bagels without “popping” them you can either pick them up and place directly on the pizza stone in your oven or you can do what we did and just put the entire baking tray straight into the oven, again on top of the pizza stone. Take your boiling kettle and pour into the empty roasting tin below the pizza stone. Finally give the bagels a good spray of water from your plant mister bottle and shut the oven door.
Set your timer for 15 minutes. Now another quick note, a normal oven is best for cooking the bagels, if however you have a fan assisted convection oven then reduce the oven temp by 10 degrees and the cooking time by a couple of minutes.

Every minute for the first 5 minutes quickly open the oven door and spray the bagels with a light mist. After five minutes you can stop with the spraying. After 15 minutes check on your creations, if they are all puffed up and golden brown open the door and tap one, it should sound hollow. If any of these conditions are not met then cook for a few more minutes. When you happy they are done remove from the oven and allow to cool on a rack.
When cold, cut in half and toast, butter and spread with some cream cheese, welsh rarebit or if your posh smoked salmon and dill and let your taste buds flood your brain with gratitude.

Shop bought bagels will never taste the same…


oh my they look so lovely! dribbling!
Love bagels but never made them myself 🙂 I guess it’s all about kneading and mixing the dough that I don’t like so tend to buy them instead 🙂
You have inspired me to give it a try. I have never given them a try, but we love bagels.
This is the first time I’ve come across a bagel recipe! I never thought you could make this at home!
Seriously? this is great. I have yet to find a bagel recipe. I might try this one over the weekend because we are bagel maniacs at my house!
Your bagels look fantastic….I can almost smell them! Not much is better than warm, fresh bagels! YUM!
These look amazing…I can almost smell them! Not much is better than warm fresh bagel! YUM!
I had always considered bagels as something to buy… but this is making me want to try this recipe.
Yummy, your sesame seed bagels look delicious. I never knew you could poach bagels too. it is somehow similar to the pretzels I made x
Smoked salmon and dill….yum! Like you, I’d never thought of making bagels. It looks as though you have to be attentive while they’re cooking, but I’ll bet the results are worth it.
I’ve never made any type of home made breads, including bagels, but now I think I will try. These look delicious, and I have always been a bagel lover!
Wow those really look delish
These look absolutely fantastic. We love bagels, but tend to buy them from the bakeries (supermarket ones are nowhere near as nice!)
I do love homemade bagels but don’t make them very often as they take so long! Definitely nicer than shop bought though if you have the time (and patience!)
Indeed, bagels aren’t a quick bake
They look delicious - probably about too complicated for my skills but I’d be happy for someone else to make them and for me to just enjoy eating them x
We bake bread a lot and always use a water spray in the oven before we put the bread in (in the oven rather than on the bagels as you did) I’m intrigued by this, but the poaching part has always put me off a bit. I have cooked croissants from scratch too (http://maybushstudio.com/2011/06/15/croissant-heaven/) but as lovely as they were it was a huge faff!
Wow, your croissants look perfect.
As to bagels, apparently they need both - water in the oven and a spray on top.